About Me

My photo
Suwanee, Georgia, United States
I have a passion for creating. I love to sew, decorate, paint, read, travel. I have been sewing and decorating for years. I love teaching and sharing my inspiration. I love thinking outside the box and believe everything can be made into something new! I am sew inspired and love simplicity in my life. I have a very successful decorating business. I also love teaching my sewing classes and sharing this gift that I have been blessed with. Sewing is becoming a dying art and I want to do my part in keeping it alive.

Friday, January 27, 2012

Sewing Room Under Construction

I love it when I have a project under construction!!!!!  I'm working on a project that just has me so excited. When I am sewing, the world just disappears.  And I just noticed, so does my organization and cleanliness.  Thought I would show you what my sewing room looks like when I am engrossed in a project.  Stuff ends up everywhere, it looks like a Fabric and Notions Store just exploded.

As you can see, I am a little messy.  Disorganization helps me be more creative.

I do have the water bottle, just to make sure I keep hydrated.

Geez, I don't even need all of the things laid out on this table.

If you look closely, you will get a hint into what I am working on!!

Oh and are you jealous of the HUGE work table.  3ft x 9ft.  I have been know to take a nap on it!!
Well hope you enjoyed a peak into my world of madness and confusion.  Know back to sewing!!

Thursday, January 26, 2012

Fabric Flowers and Fabric Origami

Fabric Origami and Fabric Flowers (Kanzashi Technique)
If you have been looking around on Pinterest and in Home Decor Catalogs, one thing that you will notice is pillows are taking on a 3 Dimension look.  More and more you are seeing flowers sewn on, buttons, beads, and even felt.  I love this new trend.  I have always loved making fabric flowers and I am one sewer that is very excited to see it as a new trend.

Fabric Origami has been around in the quilting circles for awhile.  Fabric Origami is not much different than our childhood favorite of paper origami, and actually most things that you make with paper, you can make with fabric, with a little ingenuity, a needle and thread and an iron.

Below are a few samples of fabric origami quilt squares that I made.


This is a hexagon shape with a fabric covered button.
Different folding technique than above.  This is very similar to the  little finger puppets that kids make.


On this sample, I folded the corners back to create a flower .


My favorite technique is Kanzashi.  I learned to make these by hand, however, Clover know sells a tool that helps you fold these quicker.  These flowers look beautiful on pillows, window treatments, as well as fashion accessories.


This flower is made out of beautiful silk fabric and I glued a  very unusual  button that I found.
I used two different techniques of Kanzashi, layered them and put a fabric covered button in the center.  I cut the squares large to create a bigger flower.
In the center of this I used a glass bead.
This flower is made from silk.  I had a very unusual mother of pearl flat button and I add a diamond  gemstone to the center.  I also alternated the front and back of the flower pedals.

On this Kanzashi, I used two different folding techniques , layered them and then added the little pearl button.


These are a great way for you to really create a lot of texture and add a little unexpected to your sewing projects.  I hope you will take the opportunity to learn these great techniques.  I will begin working on a tutorial and will post it soon.  


Tuesday, January 24, 2012

Don't Disturb This Groove: Chair Makeover with Beadboard Wallpaper

Don't Disturb This Groove: Chair Makeover with Beadboard Wallpaper: Way back in June, I purchased this chair at the thrift store for $2.50. It sat in my garage until recently, because I was really unsure wha...

Valance - Most popular window treatment...

Today in the workroom, I am preparing for my upcoming "Valance Class", everything you need to know to make beautiful and custom valances for your home.

So I thought that I would share with you some great inspirational pictures, to get you in the mood to start making valances.

A valance is one of the easiest treatments to make if you know a few simple ways of breaking them down or dissecting them.  With this knowledge, you can truly make one of a kind pieces of window artwork.  You don't even need a pattern if you have the know how!!  Well guess what, to get the skinny on the know how, you have to attend the class.  I can not give away all of my secrets.

But to give you a little teaser, all you have to know is the 5 types of valances and you will be able to create your very own designs as well as make anything you see in a magazine.  You can change up the horns, cascades and jabots and really make a one of a kind treatment.  Yes we will be talking about those too!!

A very simple valance can be made into a very eloquent window treatment by using the right embellishments.  You know tassels, trim, beads, embroidery, cording, banding, etc.  We will talk about when and where to use embellishments and how to think outside the box when using them.

I hope I have sparked your interest in learning all there is to know about a valance and will come and dissect them with me.  You will be making amazing valance treatments in your home before you know.

Oh and did I mention you will be making your own valance in class!!!  So start thinking about which room you want to dress up!

Very elegant shaped header with exaggerated jabots.

Very fun and simple valance with fun and playful pom pom fringe.

Mixing fabrics and a decorative buttons with tassels.

This treatment filled a large bow window.  All of the tassel fringe really made this treatments flow and move about the room.  Again a mix of fabrics and the cute bow made this treatments.

Simple yet very tailored and elegant.

Installing this treatment on a decorative iron pole gave this treatment  a touch of class.

The embroidery design in the middle brought the gathered jabot fabric and the solid center fabric together and gave your eye a little bit of eye candy.  Simply stated yet very unique.

This is one of my favorites!!  This is a simple awning treatment, but the amazing mural on the wall is what dictated the design.  I wanted to pick up where the artist left off.  The tree and leaves are appliqued on, this give the effect that nothing stops.


Hope you have enjoyed some of my favorite valances.

Call me to register for the Valance class
You to will be making these for your home!!

(770)597-7003 or athee@bellsouth.net

Monday, January 23, 2012

Original Sewing & Quilt Expo.

It's that time again!!  The Original Sewing and Quilt Expo. is coming to Duluth, GA.  I love this event.  I have attended every year for the past 5 years.  I have been blessed to help one of the instructors one year in her classes and I have volunteered to work in the Viking booth.  If you are a beginning sewer or an advanced sewer, there are classes that will fit your needs.  If you are a quilter, there are a lot of classes to inspire you to reach new dimensions.  If you are interested in embroidery, you can hone your skills and feel much more confident in exploring your creativity.  If you are interested in starting a sewing business, there are classes for you.

But the most fun and exciting thing to do is shop!!!!!  The exhibitors floor is filled with vendors that have the latest and greatest in sewing notions, sewing machines, and FABRICS oh beautiful fabrics.  One of my favorite vendors at the show is the scissor guy.  I take my scissors for a much needed sharpening and love exploring the unique scissors and sewing tools available.

There are fashion shows, hands on demonstrations and some of the most beautiful quilts I have ever seen.  Come and get inspired.

OHH!  Did I mention that they have fantastic drawings and prizes to give away!!!

The event is scheduled to start on March 8, 9 and 10th.  Register on-line to make sure the classes you want to take are available.


Check back in March.  I will be blogging about some of my classes and the great finds that I have found on the exhibitor floor.  I will be interviewing some of the great and talented instructors.  I am going to explore the exhibitors floor and show you some of the great finds that I discover.  But don't take it from me.  Register and attend this event, even if you don't want to take classes, if you are a sewer, scrape booking, embroider or other needle craft you need to come and visit the exhibit hall.

See you there.  Let me know your coming and I will give you a personal tour of the floor.  Need help deciding what classes to take, let me know and I will help you.

For those that have attended in the past, I hope that you will leave your comments below and tell me what your favorite thing is about the show.  I will be doing a drawing for for a $25.00 Visa Gift Card that you can use at the show!!!!


Friday, January 20, 2012

How to make a valance class


February 2, 2012
9:30-12:30  every Thursday for 3 weeks.
Hobby Lobby, Buford, GA

Learn how to measure and figure yardage, about the different types of valances and how to construct them, choosing the appropriate fabric, adding details, lining and interlining, and hardware and installation.  We will be making a sample valance in class.

Cost is:  $150.00

Call me or email me to register  770-597-7003 or athee@bellsouth.net

Tuesday, January 17, 2012

Sewing Class Project

Not much sewing excitement in the sewing room today.  I've been preparing for my Adult Beginning Sewing Class that will start on January 30th.  Today I worked on the class project.  A beautiful pillow for your home.  Not just a beautiful pillow, but a learning experience that pays off.  You will learn button holes, zippers, hand sewing techniques, how to read a pattern and how to decipher the foreign language on the pattern, you will learn about notions and tools and tricks to make your sewing projects come out professional and smooth.  The most important tool you will gain is how to operate and maintain your sewing machine and how to trouble shoot  stitching problems.

You will learn professional trade-only techniques and tricks of the trade.

You will leave this class with the confidence and knowledge to immediately choose a pattern and fabric and start your own project.

Contact me immediately if you want to get into this class, I have 2 openings.


Monday, January 16, 2012

Bama Jammies

Okay, I have to set you up for this blog post.  Today my sewing project was a pair of pajama pants for my brother.  So here is how this started.  I love football, actually I love college football, but mostly I love SEC football.  And more than anything I love UGA football.  Yes I am a Dawg fan.  This year when my daughter was getting ready to go to college, I was so looking forwarded to her attending the University of Georgia.  However, much to my disappointment, she chose University of Kentucky (Go Cats!).  Now my youngest has always been a Georgia fan, however, this year she decided she was a Bama fan (Roll Tide).  I don't know what brought about this change other than my brother is a HUGE Alabama fan and she adores my brother.  A few months ago, I made her a pair of fleece Bama Jammies and once my brother saw them, he had to have a pair too.  Now my brother is 40 years old.  So today that is my project!

Pajama pants are one of the easiest items to make and what a great gift they make.


I used a pattern by McCalls M6252 and Alabama Fleece.

Steps:

1.  Cut out your pattern pieces according to package directions.
2.  Match Front and Back from crotch to bottom and sew in a 5/8" seam allowance on both sections.

3. Stitch crotch all the way around from front to back.


4.  For easy insertion  of the elastic in the waist band, I sew the seam allowance down about 3" on all the inside seams at the waist band.

5.  Fold Casing down at waist line and fold under 1/4" and stitch.  Remember to leave an opening for your inserting your elastic or drawstring.

6.  Insert your elastic (I opted for a drawstring, so is opened the seam on the inside instead of leaving an opening in my casing.


7. Hem the bottom.

In less than 1.5 hours I had a pair of pajama pants made.

Pajama pants are easy to sew.  They make great gifts and you can really make them cute and fun.  Mix fabrics, add trims and use a great fun and playful fabrics.  And they are very affordable to make.  These are pictures of pajama's I found on-line.

I love the bright fabrics and look at the ruffled edge on the bottom.

Cute fabric.  I love the Capri length.  Great for summer.

Notice the contrast drawstring and the contrast around the bottom.

Great pattern for girls.  You could make a slumber party theme with this pattern.  This pattern can be found on Amazon.  Pattern is by Cindy Taylor
http://www.amazon.com/Taylor-Made-Designs-Patterns-Sew-Pajama/dp/B00158U83U


These pajama pant instructions can be found in Amy Butler's Book  "In Stitches"


Hope I have inspired you to make pajama's today.  They are great projects for beginners as well as advanced sewers.  Try adding trim, mixing fabrics and make them fun and one of a kind. These are so cute, you could wear them out to run your errands and if your daughter is like mine, she wears jammie pants to school.  Who would have figured this would happen.

Now excuse me while I go and try to repent for making these Bama Jammies and see what I can come up with to make for a DAWG fan.

Saturday, January 14, 2012

Setting Up A Sewing Space.

Ok I will admit it!  Like many of my girlfriends, I AM ADDICTED TO PINTEREST!!!!  Now I just need to find the time to do all of the over 2000 pins I have.

Since I am a passoniate seamstres, and enjoy teaching sewing classes, I think I am going to start from the beginning.  Setting up a space to sew.  I found some great ideas on Pinterest.  You can start with a small space in your home or designate a whole room.  Here are just a few ideas that I hope will spike your creativity and motivate you to set up a place to explore your creative side.

http://www.craftaholicsanonymous.net/

http://www.scrapbook.com/gallery/image/scraproom/3139967.html

http://chaletgirl.wordpress.com/2011/04/02/the-new-sewing-room/

If you are like me and already have a space set up, but have the major problem of how to store and organize all of you fabrics, notions, patterns and just stuff you have to have.  Then you will enjoy the storage and organization ideas below. 
http://www.makeit-loveit.com/2010/04/craft-room-part-1.html

http://acreativemomma.blogspot.com/2011/11/thread-organization.html

http://deliciouslyorganized.blogspot.com/search/label/Deliciously%20Organized%20Series

http://sewmanyways.blogspot.com/2011/04/sewingcraft-room-ideas-and-updates.html

For more ideas http://pinterest.com/angelathee/sewing-spaces/

Next we will begin exploring projects and sewing tips and tricks as well as following along on the numereous projects that I will be taking on this year.  Sewing Classes will begin on January 30th so stay tuned for pictures and final projects from my students.

Wednesday, January 11, 2012

New Year, New Plans

I have been very blessed that God gave me the talent to create.  I have so enjoyed the many years I have spent decorating my clients homes as well as sewing and creating some amazing and beautiful window treatments, pillows, bedding and so much more.

Recently I have felt the desire to teach others what is becoming a lost art.  Sewing.  I want to share that deep passion and desire that I have for creating.  When I am sewing the hours tick by, my mind goes into this deep concentration and settles down from thinking and stress.  So this marks the year that I will be sharing my passion with others.  Giving the gift that God gave me to others. 

I have also decided that a portion of the profit from teaching will be going to help others.  I have discovered that there are so many people that could benefit from learning to sew for a trade.  There is a need all over the world to teach women a trade so that they can support themselves and feed their children.  I don't yet know where God is leading me on this, but I am definitely up for the challenge and the journey.

Keep checking in to see where my journey takes me and to follow along with the students that are giving themselves the gift.

If anyone knows of a group or organization that could benefit from learning to sew, please let me know.  Ask and God will send you where you need to go.  So I am asking!

Sewing Classes, Suwanee, GA, Gwinnett County 2012 Schedule

Give yourself the gift of learning to sew!!

Sewing classes in GA., Gwinnett County


The following classes are scheduled:
January 30th, February 6 and 13th  9:00-12:00
 Class willl meet at 671 Main Street, Suwanee GA

February 9th, 16th and March 5th  9:30-12:30
Hobby Lobby Classroom - Buford, GA

February 14th, 21st and 28 th  9:30-12:30
Hobby Lobby Classroom - Duluth, GA at States Bridge Road

February 14th, 21st and 28 th 6:00-8:00
Hobby Lobby Classroom - Duluth, GA at States Bridge Road

Cost is $150.00
 
1.        Adult & Teen Basic Sewing
We will be learning the following:
A.         Operating a sewing machine
B.         Notions and tools needed for sewing
C.         Choosing the appropriate fabrics and threads
D.         Reading and following a pattern
E.          Cutting and measuring
F.          Different types of seams
G.        Button, zippers, cording and embellishments
 
In this class we will be making a pillowClass will run for 3 weeks. You will provide your materials and supplies. Bring your own machine.
 

Price: $150.00   
Other classes offered upon completion of Beginning Class
 

2. Embellishment:
In this class we will learn how to turn your projects into a work of art. You will be making a sample catalog of many different trims: welt cording, rouche cording, pleated edges, micro cording as well as how to sew purchased trims. Learn how to layer trims, add bead work, embroidery and use decorative stitches. We will also learn how to make your projects 3D by adding flowers, yo-yos, trapunto, ribbons and a lot of other techniques and ideas.
Cost: $150.00 all supplies and materials provided, except for binder and page projectors for the sample catalog.

Learn to Sew Home Décor projects like a pro!!

3. Making a pair of pleated drapery panels for your home. (Need to have basic sewing skills)

We will be covering:
1. Measuring and figuring fabric yardage
2. Choosing the appropriate fabrics, lining and interlining
3. Adding details
4. Cutting
5. Sewing and hemming
6. Different types of pleats
7. Drapery Hardware
You will be making a drapery sample with several different types of pleats. You will be learning professional techniques that will allow you to make draperies that are truly custom-made.

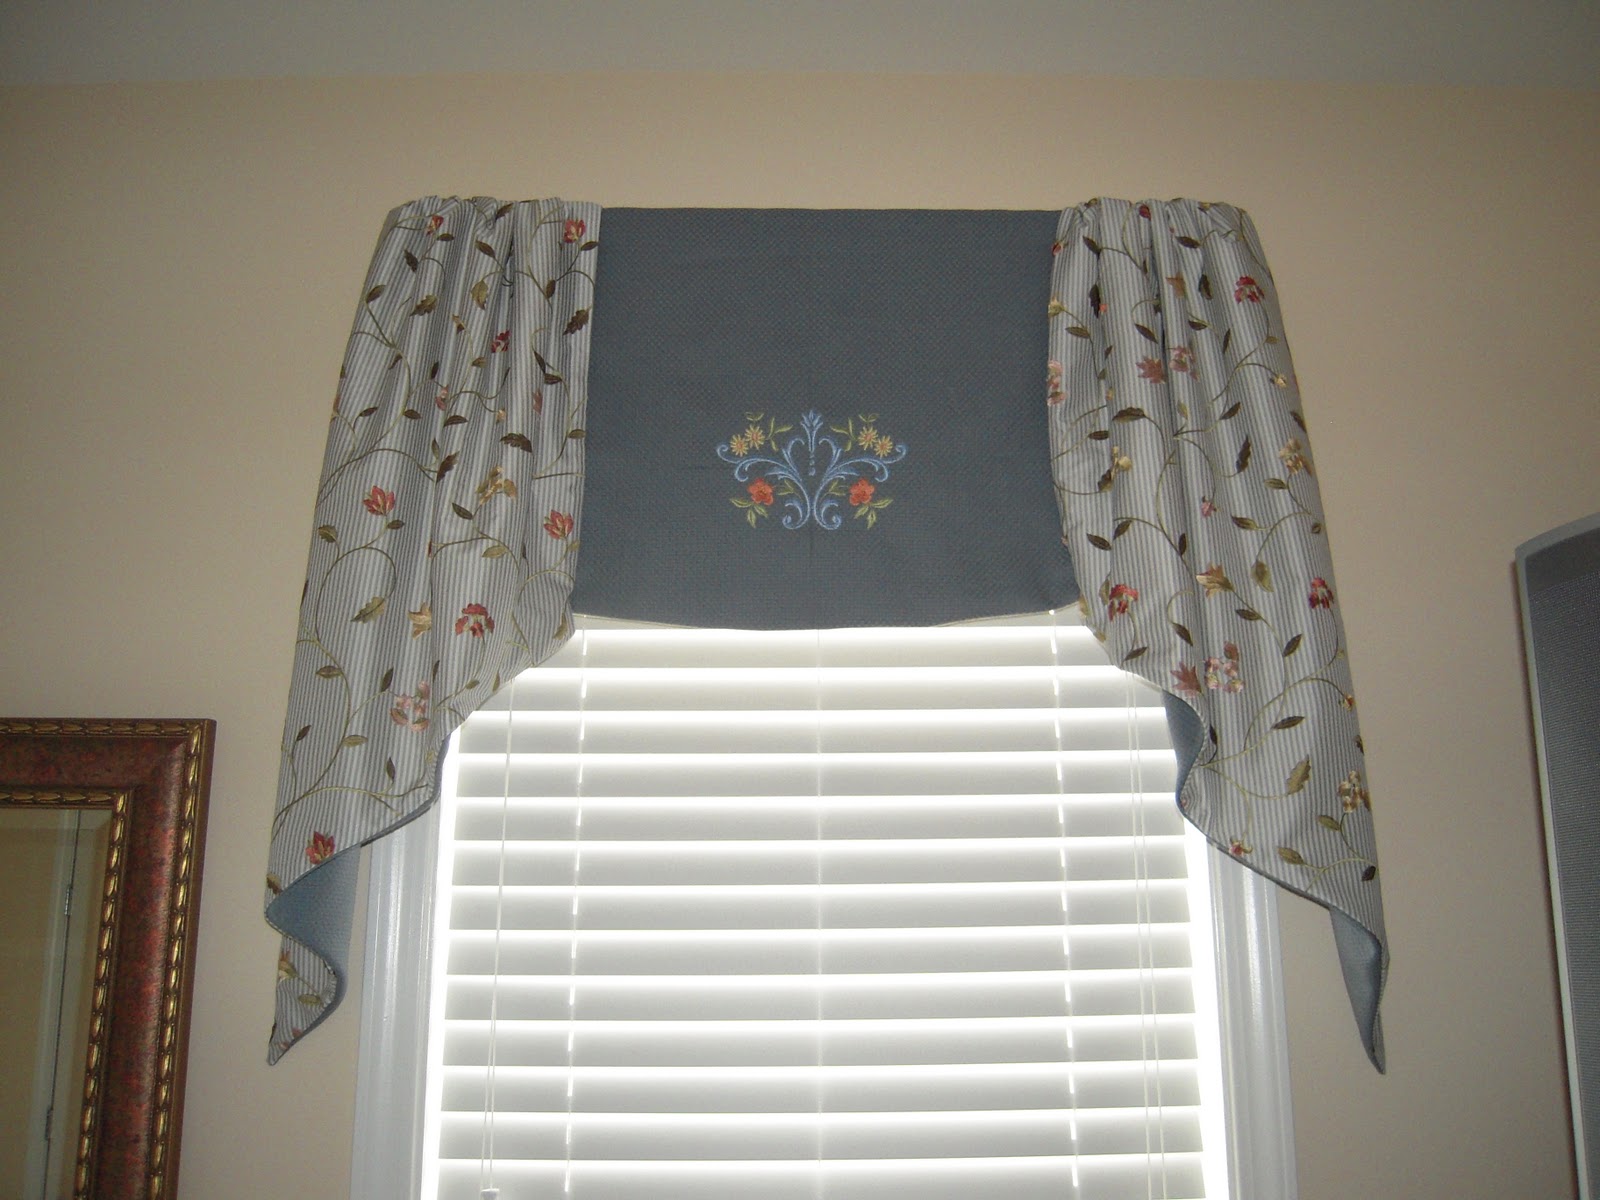
4. Making a valance (Basic sewing skills required)

We will cover:
1. Measuring and figuring yardage
2. Choosing the appropriate fabrics, lining and interlining
3. Adding details
4. Cutting
5. Sewing and hemming
6. Mounting and hardware

You will be making a valance sample. You will be learning professional techniques that will allow you to make a valance for your home that will truly be custom made.

5. Teen and Tween Bedroom Sewing: (Basic Sewing skills required)
Does your teen want that hip, cool, funky bedroom, but you don’t know where to begin. I will be teaching teens how to custom make items for her bedroom or dorm room that her friends will be so envious of.

Cost for all of the above classes: $75.00 (material and supplies not included)

6. Christmas in July

This is a weekend class. We will spend all day Saturday and Sunday making Christmas gifts and holiday decor. Projects include: Scented eye pillows, pot holders, tote bags, Holiday pillows and personalized journals.

Call or email to register, this class will fill up fast.

Cost for class will be $250.00, some supplies and materials will be provided.

7.  Decorating 101
Have you always wanted to know how to decorate your home like a pro?  Well know you can.  Learn the ends, outs, tips and techniques used by professionals to decorate your home.  We will cover space planning a room, choosing the color scheme, choosing fabrics and designing the soft furnishings, we will cover products and materials, adding interest and texture, creating a great lighting design, and accessorizing.  You will walk away comfortable and skilled in putting a room together and having it be cohesive and flow.

Cost:  $150.00

***Additional classes will follow based on demand.